Exposure Triangle: Photography Beginner’s Guide with Shooting Phones
- Ceyda Demir

- Sep 17, 2024
- 5 min read

Have you ever taken a photo and thought, "Why does this look so dark?" or "Why is everything blurry?" If you’ve been there, don’t worry—you’re not alone! Every photographer, whether beginner or pro, has faced these challenges, especially when shooting with phones. The key to solving these issues lies in understanding the exposure triangle.
Now, you might be thinking, “What exactly is the exposure triangle, and why should I care?” Well, if you want to take control of how your shooting phone photos turn out—whether they're too bright, too dark, or just right—this concept is your best friend.
In this blog, we’ll break down what the exposure triangle is and dive into its three main components: aperture, shutter speed, and ISO. We'll also explore how to adjust these settings on your shooting phone and avoid common mistakes beginners tend to make. So, if you’re ready to take the mystery out of your camera settings and bring your photography to the next level, especially with shooting phones, let's get started!
What is the Exposure Triangle with Shooting Phones?
The exposure triangle is the foundation of photography, and understanding it will unlock the true potential of your shooting phone. But what is it exactly? Picture a triangle with three corners, each representing one crucial setting: aperture, shutter speed, and ISO. These three elements work together to control the amount of light that hits your shooting phone’s sensor, ultimately determining how bright or dark your photo turns out.
Think of it this way: the exposure triangle is like balancing a recipe. If one ingredient (like light) is too much or too little, the whole dish (or in this case, your photo) could end up overcooked or underwhelming. Each setting affects the others, so adjusting one means you might need to tweak another to keep everything in balance on your shooting phone.

Now, you might wonder, “Why does it matter?” Well, understanding how these three settings interact gives you the power to take stunning photos in any lighting condition, whether you're using shooting phones in bright daylight or a dimly lit room. Ready to dive deeper into each element? Let’s start by exploring aperture, shutter speed, and ISO on shooting phones!
Aperture, Shutter Speed, and ISO: The Three Pillars of Photography with Shooting Phones
Now that we know what the exposure triangle is, let’s break down its three pillars: aperture, shutter speed, and ISO, and how they work on shooting phones. Each of these plays a crucial role in how your final image looks, and learning how to adjust them will take your shooting phone photography skills to the next level.
Aperture
Aperture refers to the opening in your shooting phone’s lens through which light enters. Imagine it like the pupil of your eye—the wider it opens, the more light comes in. A smaller aperture lets in less light. Aperture is measured in f-stops (like f/1.8 or f/16), and here’s a fun fact: the lower the f-stop number, the wider the aperture. Aperture not only affects exposure but also something called “depth of field,” which determines how much of your image is in focus. Want a blurry background with a sharp subject while shooting phones? Go for a wide aperture!
Shutter Speed
Shutter speed is how long your shooting phone’s sensor is exposed to light. Think of it as the blink of an eye—the faster the blink, the less light gets in. Shutter speed is measured in seconds or fractions of a second, like 1/250 or 1/30. A fast shutter speed is great for freezing motion (like capturing a bird in flight), while a slower shutter speed lets you create cool effects like motion blur or light trails. But beware: slower shutter speeds need a steady hand or a tripod to avoid shaky shots, even on shooting phones!

ISO
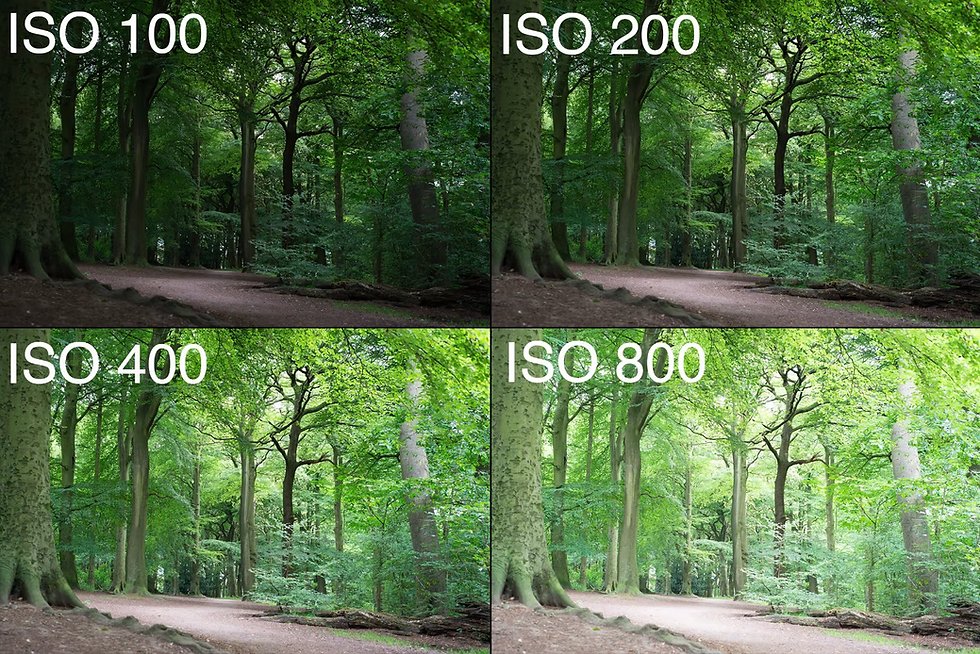
ISO controls how sensitive your shooting phone’s sensor is to light. A lower ISO (like 100) means less sensitivity and is ideal for bright conditions, while a higher ISO (like 1600 or 3200) makes your sensor more sensitive, perfect for low light. However, cranking up the ISO can also introduce noise or graininess to your photo. The trick is finding the right balance depending on your lighting situation while using shooting phones.
Together, these three settings are the key to unlocking beautifully exposed photos with shooting phones. But how do you know when to adjust each one? That’s where the magic happens—finding the right combination depending on your shooting environment! Ready to experiment with these settings on shooting phones?
Making Adjustments: Mastering the Exposure Triangle on Shooting Phones
Now that we’ve covered the basics of aperture, shutter speed, and ISO on shooting phones, let's dive into how to make adjustments to these settings to get the perfect shot. It might sound tricky at first, but with a bit of practice, you'll be able to balance these elements like a pro on your shooting phone.
Balancing Aperture, Shutter Speed, and ISO
Think of the exposure triangle as a balancing act. Changing one element affects the others, so you need to adjust them together to maintain the right exposure. Here’s a simple way to approach it:
Start with Aperture: Decide on the depth of field you want. For portraits with a blurry background, choose a wide aperture (like f/1.8). For landscapes where everything needs to be in focus, go for a smaller aperture (like f/16).
Set Your Shutter Speed: Based on your subject, decide how to capture motion. If you’re shooting something fast, like sports, choose a fast shutter speed (1/500 or higher). For low-light situations or creative effects, a slower shutter speed (1/60 or slower) might be ideal. Remember, slower speeds may require a tripod to avoid blur on your shooting phone.
Adjust ISO: Use the lowest ISO possible to minimize noise. If you’re shooting in bright conditions, ISO 100 or 200 is usually fine. In darker settings, you might need to increase ISO to 800 or higher on your shooting phone. Just keep an eye on the noise level in your images.
Common Mistakes to Avoid When Using the Exposure Triangle with Shooting Phones
Now that you’ve got a solid grasp of how to adjust aperture, shutter speed, and ISO on shooting phones, let’s talk about the common pitfalls that many photographers—especially beginners—run into. Avoiding these mistakes will save you a lot of frustration and help you capture consistently great shots with shooting phones.
Over-relying on Auto Mode: While auto mode might give you decent results, it won’t always get the exposure just right, especially in challenging lighting conditions with shooting phones.
Ignoring ISO: Many beginners forget to adjust ISO and end up with photos that are too dark or too noisy. Keep ISO as low as possible unless you’re in low-light conditions with shooting phones.
Using Too Slow a Shutter Speed without Stabilization: If you’re shooting handheld with your shooting phone, anything slower than 1/60 may result in camera shake.

Forgetting About Aperture Depth of Field: Always think about how much of your scene you want in focus when choosing your aperture setting with shooting phones.
Conclusion
Mastering the exposure triangle with shooting phones may seem like a lot at first, but once you understand the relationship between aperture, shutter speed, and ISO, you’ll be amazed at how much control you have over your photos. Whether you're shooting in bright sunlight or low-light environments, these three settings will help you nail the perfect exposure and bring your creative vision to life with shooting phones.
Remember, practice makes perfect. The more you experiment with different combinations of settings, the more comfortable you’ll become with adjusting your shooting phone to capture stunning images in any scenario. So, don't be afraid to step out of auto mode and take full control!
And if you're looking for the perfect tools to enhance your photography journey, check out the innovative shooting equipment from Phoneq. Visit our website and be sure to explore our Kickstarter campaign to learn more about how we’re revolutionizing content creation!


Comments