How to Transform Your Photos Using Shooting Phones with Adobe Photo Editor
- Ceyda Demir

- Aug 2, 2024
- 10 min read

Have you ever imagined a photo you took with your shooting phone to capture a wonderful view but felt a little dull? Or did you feel like that wonderful moment lost its impact? That’s where Adobe Photo Editor comes in! This powerful tool helps everyone from professional photographers to amateurs transform their photos into works of art. So, what is Adobe Photo Editor and what makes it so special?
Adobe Photo Editor is a user-friendly application designed to take your photos to the next level. Yes, you may be intimidated by Photoshop’s complicated interface, but don’t worry, Adobe Photo Editor has made the best of Photoshop more accessible and practical. Whether you’re doing simple retouches or complex edits, Adobe Photo Editor has all the tools you need for photos taken with shooting phones. In addition to basic edits like cropping, rotating, adding filters, and adjusting colors, you can also enhance the brightness and vibrancy of your photos with more advanced features. In addition, the user-friendly interface within the application makes the editing process both fun and satisfying.
Now you may be wondering: “Does this program meet my needs?” Here's the simple answer: If you want to add a creative touch to your photos, Adobe Photo Editor is the perfect option for you! Let's take a closer look at the features this software offers and discover how you can improve your photo editing skills using your shooting phone. Remember, every photo tells a story, and you want to make your story unique. Let's see how we can do this.

Basic Features of Adobe Photo Editor for Shooting Phones
Adobe Photo Editor offers users professional-level photo editing, while also attracting attention with its easy-to-use and accessible interface. Although most applications have professional settings, their interface is not preferred by many because it is too complicated. But this software offers an ideal and high-level editing environment for both beginners and experienced users with shooting phones. So how does it do this? Let's take a look together.
User Interface and Navigation for Shooting Phones
Adobe Photo Editor's user interface makes the editing process effortless and enjoyable thanks to its intuitive design. Everything is organized in a very understandable and orderly manner, so you can easily find any tool you need for photos taken with shooting phones. In other words, thanks to its user-friendly structure, you can start editing your photos without getting lost in complicated menus.
Each feature in the interface is represented by clear icons and clear labels, making navigation extremely simple. In addition, guides and tips designed for beginners make the software even easier to use. So you can instantly understand what you need to do to get the best results. To further enhance the user experience, Adobe Photo Editor also offers interface customization options based on personal preferences.
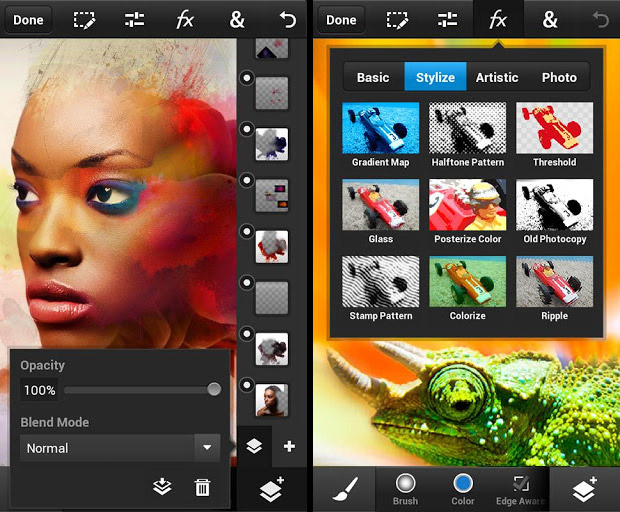
Photo Editing Tools for Shooting Phones
Adobe Photo Editor offers a wide range of editing tools that allow users to shape their photos taken with shooting phones as they wish. With these tools, you can edit your photos professionally and reflect your personal style. Now your photos will be much more impressive and original.
Crop: Removes unwanted parts of the photo, highlights the focal point, and creates a more impressive composition.
Rotate: Use the rotation feature to correct photos taken at the wrong angle, and make both vertical and horizontal adjustments.
Resize: Adjust your photos according to the desired dimensions, making them suitable for social media or printing. This way, you can get images in the most ideal sizes for different platforms.

These basic editing tools provide a great starting point for editing your photos taken with shooting phones quickly and effectively. At the same time, it allows users to shape their photos as they wish without limiting their creativity.
Color and Tone Settings for Shooting Phones
Adobe Photo Editor allows you to get more vivid and realistic images by adjusting the colors and tones of your photos taken with shooting phones down to the smallest detail. This both makes your photos more impressive and saves you from the problem of blur. So what are these tools? Let's take a look together.
White Balance: It helps you capture natural and accurate color tones in your photos. You can achieve a more natural look by balancing cold or warm tones with white balance adjustments. In addition, if there is a decrease in quality due to lighting problems in your photo, it will directly prevent this problem.
Exposure: It adjusts the brightness of overly bright or dark photos, making the details look better. In this way, you can highlight important elements in your photo and determine the part your audience should focus on.
Contrast: By increasing the difference between light and shadow in the photo, you can create more dynamic and impressive images. You both get a sharper photo and get rid of lighting distortions.
Brightness: By adjusting the general light level of the photo, you can change the atmosphere and feeling of the photo. Sometimes the photos we take with shooting phones can be too dark or too bright, but this is not a reason to give up on the photo. You can solve this problem by playing with the brightness values of your photo.

Thanks to these color and tone settings, you can maximize the potential of each photo taken with shooting phones using Adobe Photo Editor and create original compositions by editing colors and tones as you wish.
Advanced Editing Tools for Shooting Phones
Up to this point, we have only talked about basic editing tools. Now it's time for advanced editing tools. Adobe Photo Editor doesn't just offer basic editing tools; It also includes advanced tools that allow users to edit their photos taken with shooting phones more deeply and creatively. These advanced editing tools allow you to add a professional touch to your photos. Let's take a closer look at the possibilities these tools offer.
Layers and Masks for Shooting Phones
One of the most powerful features of Adobe Photo Editor is the ability to work with layers and masks. So, what do these features do and how are they used for photos taken with shooting phones? Let's take a look together.
Layers: Layers allow you to make different edits on photos independently of each other. While making many different edits, you can make changes without disturbing the original photo and then control your edits by switching between these layers. For example, while making color adjustments on one layer, you can perform a sharpening operation on another layer. Thanks to the flexibility offered by layers, you can quickly switch between edits and test different editing styles.
Masks: Masks help you control certain areas during the editing process. With masks, you can make more precise edits by affecting only certain parts of the photo. For example, if you want to blur only the background in a portrait photo taken with a shooting phone, you can do this with masks. Masks allow you to add more depth and detail to your photos by working with different layers.

Working with layers and masks helps you edit your photos taken with shooting phones professionally, while also making the editing process more flexible and controlled. These tools play an important role, especially in complex projects or when editing your creative photos. Now that we have that covered, let's take a look at filters and effects.
Filters and Effects for Shooting Phones
Adobe Photo Editor offers a wide variety of filters and effects to add an artistic touch to your photos taken with shooting phones. These tools allow you to quickly change the atmosphere and style of your photos.
Filters: If you want to quickly add a different atmosphere to your photos taken with shooting phones, filters are a great place to start. Adobe Photo Editor offers a variety of filter options for vintage, black and white, cinematic, and many more styles. These filters can transform your photos with a single click, giving them a different aesthetic look.
Effects: It is also possible to go beyond filters and add special effects to your photos. Adobe Photo Editor, you can make your photos more impressive with effects such as blur, vignette, and sharpening. With these effects, you can create creative projects by highlighting the focal point or adding a dramatic touch to the photo. You can also create a different world in your photos with light effects and color tones.

Filters and effects are a perfect tool to make your photos taken with shooting phones more interesting and aesthetic. If you want to express your creativity and take your photos to an artistic level, these tools offer you a wide range.
Sharpening and Noise Reduction for Shooting Phones
Now that we have completed one more step, our next step is sharpening and noise reduction. Increasing the clarity of your photos and reducing unwanted noise are among the important features offered by Adobe Photo Editor. These tools are the keys to making your photos taken with shooting phones look more professional and high-quality. Let's examine these 2 concepts.
Sharpening: If you want to bring the details of your photos to the forefront, sharpening tools may be just what you are looking for. Sharpening helps to make the fine details in your photos more apparent. Adobe Photo Editor offers various settings to perform this process. Thus, you can sharpen without disturbing the natural texture of the photo and achieve the desired effect. You can achieve more impressive results by using sharpening, especially in landscape or architectural photos.
Noise Reduction: The noise problem frequently encountered in photos taken in low light conditions can be easily eliminated with Adobe Photo Editor's noise reduction tools. Noise reduction eliminates unwanted dots and pixels in your photos, providing a cleaner and clearer image. Adobe Photo Editor allows you to reduce noise while preserving the details of your photo by offering different noise reduction options.

Sharpening and noise reduction tools are indispensable features for users who want to edit their photos taken with shooting phones at a professional level. With these tools, you can increase the clarity of your photos and get more impressive images by eliminating unwanted elements.
Advantages of Adobe Photo Editor for Photographers Using Shooting Phones
Yes. Now that we've talked about the application so much, I think you've more or less got an idea. Now I want to talk about its advantages for you. Adobe Photo Editor takes your creative processes to the next level with the powerful features and flexibility it offers for photographers. Whether you are an amateur photographer or a professional, you can have more control over your photos and achieve the desired results faster with these tools. Let's take a look at some of the advantages Adobe Photo Editor offers photographers.
RAW File Processing for Shooting Phones
RAW files are considered one of the most powerful formats in digital photography. So, what makes RAW files so special and how are they processed with Adobe Photo Editor?
Advantages of RAW Files: The RAW format is a file format that contains raw data from your camera sensor. This format offers you greater flexibility when editing your photos taken with shooting phones by storing more data on the photo. While compressed formats such as JPEG usually cause some data loss, the RAW format keeps these losses to a minimum and provides more color information, dynamic range, and detail. This offers more possibilities for editing your photos.
RAW File Processing with Adobe Photo Editor: Adobe Photo Editor offers you various tools when processing RAW files taken with shooting phones. With these tools, you can have precise control over white balance, exposure, color settings, and many other parameters. Adobe Photo Editor supports many camera models and formats, allowing you to make creative edits while preserving the quality of your photos. In addition, thanks to the color profiles and improved algorithms offered by the software, you can get the maximum efficiency from your RAW files and achieve higher quality results.

Processing RAW files provides a great advantage for revealing the natural beauty of your photos and achieving the desired result. With the advanced tools offered by Adobe Photo Editor, you can evaluate these files in the best way and achieve professional results.
Creating HDR and Panoramic Photos with Shooting Phones
Adobe Photo Editor stands out with its HDR and panoramic photo creation features that allow you to add more depth and width to your photos taken with shooting phones. So, how do these features work and what benefits do they offer?
Creating HDR Photos: HDR (High Dynamic Range) photography aims to achieve a wider dynamic range by combining multiple photos at different exposures. This technique better captures the details in both the light and dark areas of the photo. Adobe Photo Editor offers advanced tools for creating HDR photos. With features like auto-alignment and ghosting, you can easily create HDR images and make the results look more natural. This is especially great for impressive landscape and architectural photos taken with shooting phones.
Take Panoramic Shots: Panoramic photos are created by combining multiple photos to capture wide-angle scenes in a single image. Adobe Photo Editor has panoramic creation tools that let you seamlessly stitch these photos together. The program automatically detects and corrects transitions between photos, so you can create smooth and realistic panoramas. This feature gives you a wider perspective in wide landscape shots, city skylines, or crowded scenes.

HDR and panoramic photo creation capabilities allow you to add more depth and perspective to your photos. Adobe Photo Editor lets you make your photos more attractive and impressive by using these techniques.
Lens Correction and Perspective Adjustments for Shooting Phones
One of the most common problems in photography is distortions and perspective errors caused by the lens. Adobe Photo Editor helps you solve these problems, especially for photos taken with shooting phones.
Keystone Correction: Lens distortion is a common problem, especially in photos taken with wide-angle lenses. Adobe Photo Editor offers a powerful lens correction tool to correct these distortions. The software automatically detects the type of lens and applies the correct correction processes. In this way, the curvatures and distortions in your photos are eliminated, and a more natural look is achieved.
Perspective Adjustments: Adobe Photo Editor offers advanced adjustment tools to correct perspective errors in your photos. These problems, which are especially common in architectural and interior photos taken with shooting phones, can be quickly fixed with correct perspective corrections. The program helps you create more balanced and symmetrical images by aligning the angles and lines of the photo. This feature makes your photos look more professional and provides a better experience for the viewer.

Lens correction and perspective adjustments increase the quality of your photos, allowing you to achieve more realistic and impressive images. Adobe Photo Editor takes your photos taken with shooting phones to a professional level thanks to the tools it offers to correct such problems.
Conclusion: Take Your Photography to the Next Level with Adobe Photo Editor
Adobe Photo Editor enriches your creative processes and improves your photo editing skills with its wide range of features offered for photographers using shooting phones. Thanks to advanced tools such as RAW file processing, HDR and panoramic photo creation, lens correction, and perspective adjustments, you can process every photo in professional quality. These features bring out the details and colors in your photos taken with shooting phones in the best way while allowing you to freely express your creative vision.
Adobe Photo Editor's user-friendly interface and comprehensive editing tools offer an ideal solution for both amateur and professional photographers. It is now much easier to quickly correct errors in your photos, emphasize details, and add artistic touches. Offering all the tools you need to be successful in photography, this software will take your photo editing experience one step further.
In short, you can capture every moment more vividly and impressively with Adobe Photo Editor and turn your photos into a perfect work of art. Experience this software that will be your best friend in your photography adventure and enjoy getting professional results in every shot. For more photography tips and technical information, be sure to check out our other resources about Adobe Photo Editor! Also, if you're interested in photography, you can look at our other blogs and website.


Comments